Building React Apps with the Nx Standalone Setup
In this tutorial you'll learn how to use React with Nx in a "standalone" (non-monorepo) setup.
What are you going to learn?
- how to create a new React application
- how to run a single task (i.e. serve your app) or run multiple tasks in parallel
- how to leverage code generators to scaffold components
- how to modularize your codebase and impose architectural constraints for better maintainability
Note, this tutorial sets up a repo with a single application at the root level that breaks out its code into libraries to add structure. If you are looking for a React monorepo setup then check out our React monorepo tutorial.
Note, while you could easily use Nx together with your manually set up React application, we're going to use the @nx/react plugin for this tutorial which provides some nice enhancements when working with React. Visit our "Why Nx" page to learn more about plugins and what role they play in the Nx architecture.
Warm Up
Here's the source code of the final result for this tutorial.
Example repository/nrwl/nx-recipes/tree/main/react-standalone
Creating a new React App
Create a new standalone React application with the following command:
❯
? Bundler to be used to build the application … Vite [ https://vitejs.dev/ ] Webpack [ https://webpack.js.org/ ] Rspack [ https://www.rspack.dev/ ]
You can choose any bundler you like. In this tutorial we're going to use Vite. The above command generates the following structure:
└─ myreactapp
   ├─ ...
   ├─ e2e
   │  └─ ...
   ├─ public
   │  └─ ...
   ├─ src
   │  ├─ app
   │  │  ├─ app.module.css
   │  │  ├─ app.spec.tsx
   │  │  ├─ app.tsx
   │  │  └─ nx-welcome.tsx
   │  ├─ assets
   │  ├─ main.tsx
   │  └─ styles.css
   ├─ index.html
   ├─ nx.json
   ├─ package.json
   ├─ project.json
   ├─ tsconfig.app.json
   ├─ tsconfig.json
   ├─ tsconfig.spec.json
   └─ vite.config.ts
The setup includes..
- a new React application at the root of the Nx workspace (
src/app) - a Cypress based set of e2e tests (
e2e/) - Prettier preconfigured
- ESLint preconfigured
- Jest preconfigured
Let me explain a couple of things that might be new to you.
| File | Description |
|---|---|
nx.json | This is where we fine-tune how Nx works. We define what cacheable operations there are, and configure our task pipeline. More on that soon. |
project.json | This file contains the targets that can be invoked for the myreactapp project. It is like a more evolved version of simple package.json scripts with more metadata attached. You can read more about it here. |
Serving the App
The most common tasks are already mapped in the package.json file:
{
  "name": "reactutorial",
  "scripts": {
    "start": "nx serve",
    "build": "nx build",
    "test": "nx test"
  }
  ...
}
To serve your new React application, just run: npm start. Alternatively you can directly use Nx by using
❯
nx serve
Your application should be served at http://localhost:4200.
Nx uses the following syntax to run tasks:

All targets, such as serve, build, test or your custom ones, are defined in the project.json file.
{
  "name": "myreactapp",
  ...
  "targets": {
    "serve": { ... },
    "build": { ... },
    "preview": { ... },
    "test": { ... },
    "lint": { ... },
    "serve-static": { ... },
  },
}
Note that Nx can pick up tasks from both, the package.json as well as the project.json. Read more
Each target contains a configuration object that tells Nx how to run that target.
{
  "name": "myreactapp",
  ...
  "targets": {
    "serve": {
      "executor": "@nx/vite:dev-server",
      "defaultConfiguration": "development",
      "options": {
        "buildTarget": "reactutorial:build"
      },
      "configurations": {
        "development": {
          "buildTarget": "reactutorial:build:development",
          "hmr": true
        },
        "production": {
          "buildTarget": "reactutorial:build:production",
          "hmr": false
        }
      }
     },
     ...
  },
}
The most critical parts are:
executor- this is of the syntax<plugin>:<executor-name>, where thepluginis an NPM package containing an Nx Plugin and<executor-name>points to a function that runs the task. In this case, the@nx/viteplugin contains thedev-serverexecutor which serves the React app using Vite.options- these are additional properties and flags passed to the executor function to customize it
Learn more about how to run tasks with Nx.
Testing and Linting - Running Multiple Tasks
Our current setup doesn't just come with targets for serving and building the React application, but also has targets for unit testing, e2e testing and linting. Again, these are defined in the project.json file. We can use the same syntax as before to run these tasks:
nx test # runs tests using Vitest (or you can configure it to use Jest)
nx lint # runs linting with ESLint
nx e2e e2e # runs e2e tests with Cypress
More conveniently, we can also run them in parallel using the following syntax:
❯
✔ nx run e2e:lint (2s) ✔ nx run myreactapp:lint (2s) ✔ nx run myreactapp:test (2s) ✔ nx run e2e:e2e (6s) —————————————————————————————————————————————————————— > NX Successfully ran targets test, lint, e2e for 2 projects (7s)
Caching
One thing to highlight is that Nx is able to cache the tasks you run.
Note that all of these targets are automatically cached by Nx. If you re-run a single one or all of them again, you'll see that the task completes immediately. In addition, (as can be seen in the output example below) there will be a note that a matching cache result was found and therefore the task was not run again.
❯
✔ nx run e2e:lint [existing outputs match the cache, left as is] ✔ nx run myreactapp:lint [existing outputs match the cache, left as is] ✔ nx run myreactapp:test [existing outputs match the cache, left as is] ✔ nx run e2e:e2e [existing outputs match the cache, left as is] —————————————————————————————————————————————————————— > NX Successfully ran targets test, lint, e2e for 5 projects (54ms) Nx read the output from the cache instead of running the command for 10 out of 10 tasks.
Not all tasks might be cacheable though. You can configure cacheableOperations in the nx.json file. You can also learn more about how caching works.
Nx Plugins? Why?
One thing you might be curious about is the project.json. You may wonder why we define tasks inside the project.json file instead of using the package.json file with scripts that directly launch Vite.
Nx understands and supports both approaches, allowing you to define targets either in your package.json or project.json files. While both serve a similar purpose, the project.json file can be seen as an advanced form of package.json scripts, providing additional metadata and capabilities. In this tutorial, we utilize the project.json approach primarily because we take advantage of Nx Plugins.
So, what are Nx Plugins? Nx Plugins are optional packages that extend the capabilities of Nx, catering to various specific technologies. For instance, we have plugins tailored to React (e.g., @nx/react), Vite (@nx/vite), Cypress (@nx/cypress), and more. These plugins offer additional features, making your development experience more efficient and enjoyable when working with specific tech stacks.
visit our "Why Nx" page for more deails.
Creating New Components
You can just create new React components as you normally would. However, Nx plugins usually also ship generators. They allow you to easily scaffold code, configuration or entire projects. To see what capabilities the @nx/react plugin ships, run the following command and inspect the output:
❯
> NX Capabilities in @nx/react: GENERATORS init : Initialize the `@nrwl/react` plugin. application : Create a React application. library : Create a React library. component : Create a React component. redux : Create a Redux slice for a project. storybook-configuration : Set up storybook for a React app or library. component-story : Generate storybook story for a React component stories : Create stories/specs for all components declared in an app or library. component-cypress-spec : Create a Cypress spec for a UI component that has a story. hook : Create a hook. host : Generate a host react application remote : Generate a remote react application cypress-component-configuration : Setup Cypress component testing for a React project component-test : Generate a Cypress component test for a React component setup-tailwind : Set up Tailwind configuration for a project. setup-ssr : Set up SSR configuration for a project. EXECUTORS/BUILDERS module-federation-dev-server : Serve a host or remote application. module-federation-ssr-dev-server : Serve a host application along with it's known remotes.
If you prefer a more integrated experience, you can install the "Nx Console" extension for your code editor. It has support for VSCode, IntelliJ and ships a LSP for Vim. Nx Console provides autocompletion support in Nx configuration files and has UIs for browsing and running generators.
More info can be found in the integrate with editors article.
Run the following command to generate a new "hello-world" component. Note how we append --dry-run to first check the output.
❯
> NX Generating @nx/react:component ✔ Should this component be exported in the project? (y/N) · false CREATE src/app/hello-world/hello-world.module.css CREATE src/app/hello-world/hello-world.spec.tsx CREATE src/app/hello-world/hello-world.tsx NOTE: The "dryRun" flag means no changes were made.
As you can see it generates a new component in the app/hello-world/ folder. If you want to actually run the generator, remove the --dry-run flag.
import styles from './hello-world.module.css';

/* eslint-disable-next-line */
export interface HelloWorldProps {}

export function HelloWorld(props: HelloWorldProps) {
  return (
    <div className={styles['container']}>
      <h1>Welcome to HelloWorld!</h1>
    </div>
  );
}

export default HelloWorld;
Building the App for Deployment
If you're ready and want to ship your application, you can build it using
❯
vite v4.3.5 building for production... ✓ 33 modules transformed. dist/myreactapp/index.html 0.48 kB │ gzip: 0.30 kB dist/myreactapp/assets/index-e3b0c442.css 0.00 kB │ gzip: 0.02 kB dist/myreactapp/assets/index-378e8124.js 165.64 kB │ gzip: 51.63 kB ✓ built in 496ms —————————————————————————————————————————————————————————————————————————————————————————————————————————— > NX Successfully ran target build for project reactutorial (1s)
All the required files will be placed in the dist/myreactapp folder and can be deployed to your favorite hosting provider.
You're ready to go!
In the previous sections you learned about the basics of using Nx, running tasks and navigating an Nx workspace. You're ready to ship features now!
But there's more to learn. You have two possibilities here:
- Jump to the next steps section to find where to go from here or
- keep reading and learn some more about what makes Nx unique when working with React.
Modularizing your React App with Local Libraries
When you develop your React application, usually all your logic sits in the app folder. Ideally separated by various folder names which represent your "domains". As your app grows, this becomes more and more monolithic though.
└─ myreactapp
   ├─ ...
   ├─ src
   │  ├─ app
   │  │  ├─ products
   │  │  ├─ cart
   │  │  ├─ ui
   │  │  ├─ ...
   │  │  └─ app.tsx
   │  ├─ ...
   │  └─ main.tsx
   ├─ ...
   ├─ package.json
   ├─ ...
Nx allows you to separate this logic into "local libraries". The main benefits include
- better separation of concerns
- better reusability
- more explicit "APIs" between your "domain areas"
- better scalability in CI by enabling independent test/lint/build commands for each library
- better scalability in your teams by allowing different teams to work on separate libraries
Creating Local Libraries
Let's assume our domain areas include products, orders and some more generic design system components, called ui. We can generate a new library for each of these areas using the React library generator:
nx g @nx/react:library products --unitTestRunner=vitest --bundler=none --directory=modules
nx g @nx/react:library orders --unitTestRunner=vitest --bundler=none --directory=modules
nx g @nx/react:library ui --unitTestRunner=vitest --bundler=none --directory=modules/shared
Note how we use the --directory flag to place the libraries into a subfolder. You can choose whatever folder structure you like, even keep all of them at the root-level.
Running the above commands should lead to the following directory structure:
└─ myreactapp
   ├─ ...
   ├─ modules
   │  ├─ products
   │  │  ├─ ...
   │  │  ├─ project.json
   │  │  ├─ src
   │  │  │  ├─ index.ts
   │  │  │  └─ lib
   │  │  │     ├─ modules-products.spec.ts
   │  │  │     └─ modules-products.ts
   │  │  ├─ tsconfig.json
   │  │  ├─ tsconfig.lib.json
   │  │  ├─ tsconfig.spec.json
   │  │  └─ vite.config.ts
   │  ├─ orders
   │  │  ├─ ...
   │  │  ├─ project.json
   │  │  ├─ src
   │  │  │  ├─ index.ts
   │  │  │  └─ ...
   │  │  └─ ...
   │  └─ shared
   │     └─ ui
   │        ├─ ...
   │        ├─ project.json
   │        ├─ src
   │        │  ├─ index.ts
   │        │  └─ ...
   │        └─ ...
   ├─ src
   │  ├─ app
   │  │  ├─ hello-world
   │  │  │  ├─ hello-world.module.css
   │  │  │  ├─ hello-world.spec.tsx
   │  │  │  └─ hello-world.tsx
   │  │  └─ ...
   │  ├─ ...
   │  └─ main.tsx
   ├─ ...
Each of these libraries
- has its own
project.jsonfile with corresponding targets you can run (e.g. running tests for just orders:nx test modules-orders) - has a name based on the
--directoryflag, e.g.modules-orders; you can find the name in the correspondingproject.jsonfile - has a dedicated
index.tsfile which is the "public API" of the library - is mapped in the
tsconfig.base.jsonat the root of the workspace
Importing Libraries into the React Application
All libraries that we generate automatically have aliases created in the root-level tsconfig.base.json.
{
  "compilerOptions": {
    ...
    "paths": {
      "@myreactapp/modules/products": ["modules/products/src/index.ts"],
      "@myreactapp/modules/orders": ["modules/orders/src/index.ts"],
      "@myreactapp/modules/shared/ui": ["modules/shared/ui/src/index.ts"]
    },
    ...
  },
}
Hence we can easily import them into other libraries and our React application. As an example, let's create and expose a ProductList component from our modules/products library. Either create it by hand or run
❯
nx g @nx/react:component product-list --project=modules-products
We don't need to implement anything fancy as we just want to learn how to import it into our main React application.
import styles from './product-list.module.css';

/* eslint-disable-next-line */
export interface ProductListProps {}

export function ProductList(props: ProductListProps) {
  return (
    <div className={styles['container']}>
      <h1>Welcome to ProductList!</h1>
    </div>
  );
}

export default ProductList;
Make sure the ProductList is exported via the index.ts file of our products library. This is our public API with the rest of the workspace. Only export what's really necessary to be usable outside the library itself.
export * from './lib/product-list/product-list';
We're ready to import it into our main application now. First (if you haven't already), let's set up React Router.
❯
npm install react-router-dom
Configure it in the main.tsx.
import { StrictMode } from 'react';
import { BrowserRouter } from 'react-router-dom';
import ReactDOM from 'react-dom/client';

import App from './app/app';

const root = ReactDOM.createRoot(
  document.getElementById('root') as HTMLElement
);

root.render(
  <StrictMode>
    <BrowserRouter>
      <App />
    </BrowserRouter>
  </StrictMode>
);
Then we can import the ProductList component into our app.tsx and render it via the routing mechanism whenever a user hits the /products route.
import { Route, Routes } from 'react-router-dom';

// importing the component from the library
import { ProductList } from '@myreactapp/modules/products';

function Home() {
  return <h1>Home</h1>;
}

export function App() {
  return (
    <Routes>
      <Route path="/" element={<Home />}></Route>
      <Route path="/products" element={<ProductList />}></Route>
    </Routes>
  );
}

export default App;
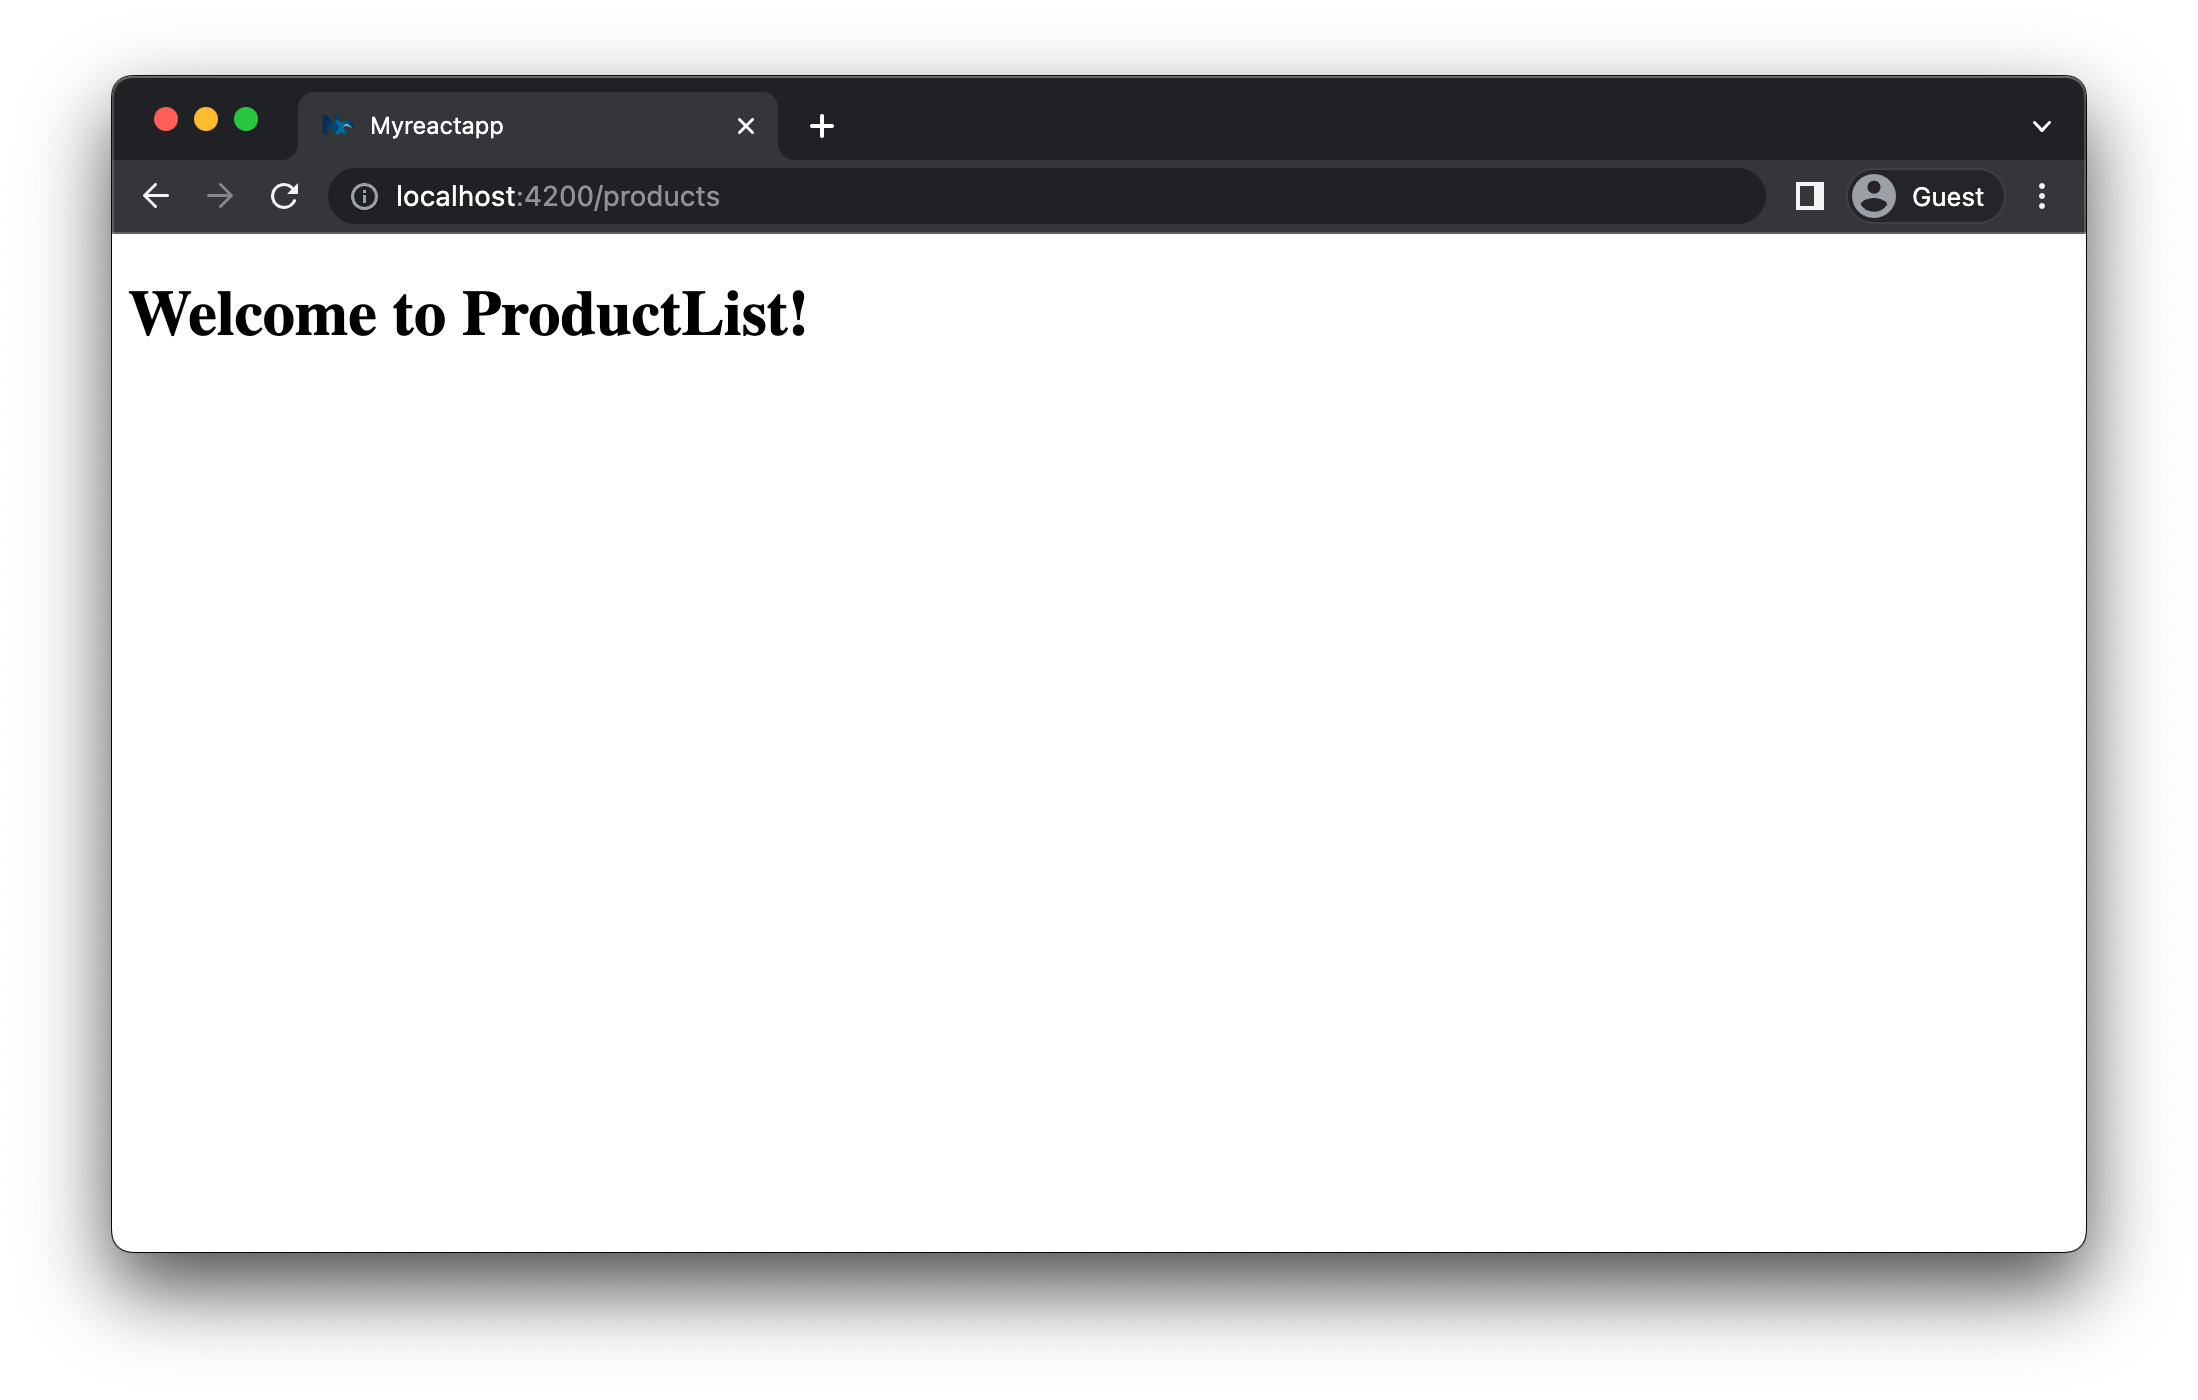
Serving your app (nx serve) and then navigating to /products should give you the following result:
Let's apply the same for our orders library.
- generate a new component
OrderListinmodules/ordersand export it in the correspondingindex.tsfile - import it into the
app.tsxand render it via the routing mechanism whenever a user hits the/ordersroute
In the end, your app.tsx should look similar to this:
import { Route, Routes } from 'react-router-dom';
import { ProductList } from '@myreactapp/modules/products';
import { OrderList } from '@myreactapp/modules/orders';

function Home() {
  return <h1>Home</h1>;
}

export function App() {
  return (
    <Routes>
      <Route path="/" element={<Home />}></Route>
      <Route path="/products" element={<ProductList />}></Route>
      <Route path="/orders" element={<OrderList />}></Route>
    </Routes>
  );
}

export default App;
Visualizing your Project Structure
Nx automatically detects the dependencies between the various parts of your workspace and builds a project graph. This graph is used by Nx to perform various optimizations such as determining the correct order of execution when running tasks like nx build, identifying affected projects and more. Interestingly you can also visualize it.
Just run:
❯
nx graph
You should be able to see something similar to the following in your browser.
Notice how modules-shared-ui is not yet connected to anything because we didn't import it in any of our projects.
Exercise for you: change the codebase such that modules-shared-ui is used by modules-orders and modules-products. Note: you need to restart the nx graph command to update the graph visualization or run the CLI command with the --watch flag.
Imposing Constraints with Module Boundary Rules
Once you modularize your codebase you want to make sure that the modules are not coupled to each other in an uncontrolled way. Here are some examples of how we might want to guard our small demo workspace:
- we might want to allow
modules-ordersto import frommodules-shared-uibut not the other way around - we might want to allow
modules-ordersto import frommodules-productsbut not the other way around - we might want to allow all libraries to import the
modules-shared-uicomponents, but not the other way around
When building these kinds of constraints you usually have two dimensions:
- type of project: what is the type of your library. Example: "feature" library, "utility" library, "data-access" library, "ui" library
- scope (domain) of the project: what domain area is covered by the project. Example: "orders", "products", "shared" ... this really depends on the type of product you're developing
Nx comes with a generic mechanism that allows you to assign "tags" to projects. "tags" are arbitrary strings you can assign to a project that can be used later when defining boundaries between projects. For example, go to the project.json of your modules-orders library and assign the tags type:feature and scope:orders to it.
{
  ...
  "tags": ["type:feature", "scope:orders"]
}
Then go to the project.json of your modules-products library and assign the tags type:feature and scope:products to it.
{
  ...
  "tags": ["type:feature", "scope:products"]
}
Finally, go to the project.json of the modules-shared-ui library and assign the tags type:ui and scope:shared to it.
{
  ...
  "tags": ["type:ui", "scope:shared"]
}
Notice how we assign scope:shared to our UI library because it is intended to be used throughout the workspace.
Next, let's come up with a set of rules based on these tags:
type:featureshould be able to import fromtype:featureandtype:uitype:uishould only be able to import fromtype:uiscope:ordersshould be able to import fromscope:orders,scope:sharedandscope:productsscope:productsshould be able to import fromscope:productsandscope:shared
To enforce the rules, Nx ships with a custom ESLint rule. Open the .eslintrc.base.json at the root of the workspace and add the following depConstraints in the @nx/enforce-module-boundaries rule configuration:
{
  ...
  "overrides": [
    {
      ...
      "rules": {
        "@nx/enforce-module-boundaries": [
          "error",
          {
            "enforceBuildableLibDependency": true,
            "allow": [],
            "depConstraints": [
              {
                "sourceTag": "*",
                "onlyDependOnLibsWithTags": ["*"]
              },
              {
                "sourceTag": "type:feature",
                "onlyDependOnLibsWithTags": ["type:feature", "type:ui"]
              },
              {
                "sourceTag": "type:ui",
                "onlyDependOnLibsWithTags": ["type:ui"]
              },
              {
                "sourceTag": "scope:orders",
                "onlyDependOnLibsWithTags": [
                  "scope:orders",
                  "scope:products",
                  "scope:shared"
                ]
              },
              {
                "sourceTag": "scope:products",
                "onlyDependOnLibsWithTags": ["scope:products", "scope:shared"]
              },
              {
                "sourceTag": "scope:shared",
                "onlyDependOnLibsWithTags": ["scope:shared"]
              }
            ]
          }
        ]
      }
    },
    ...
  ]
}
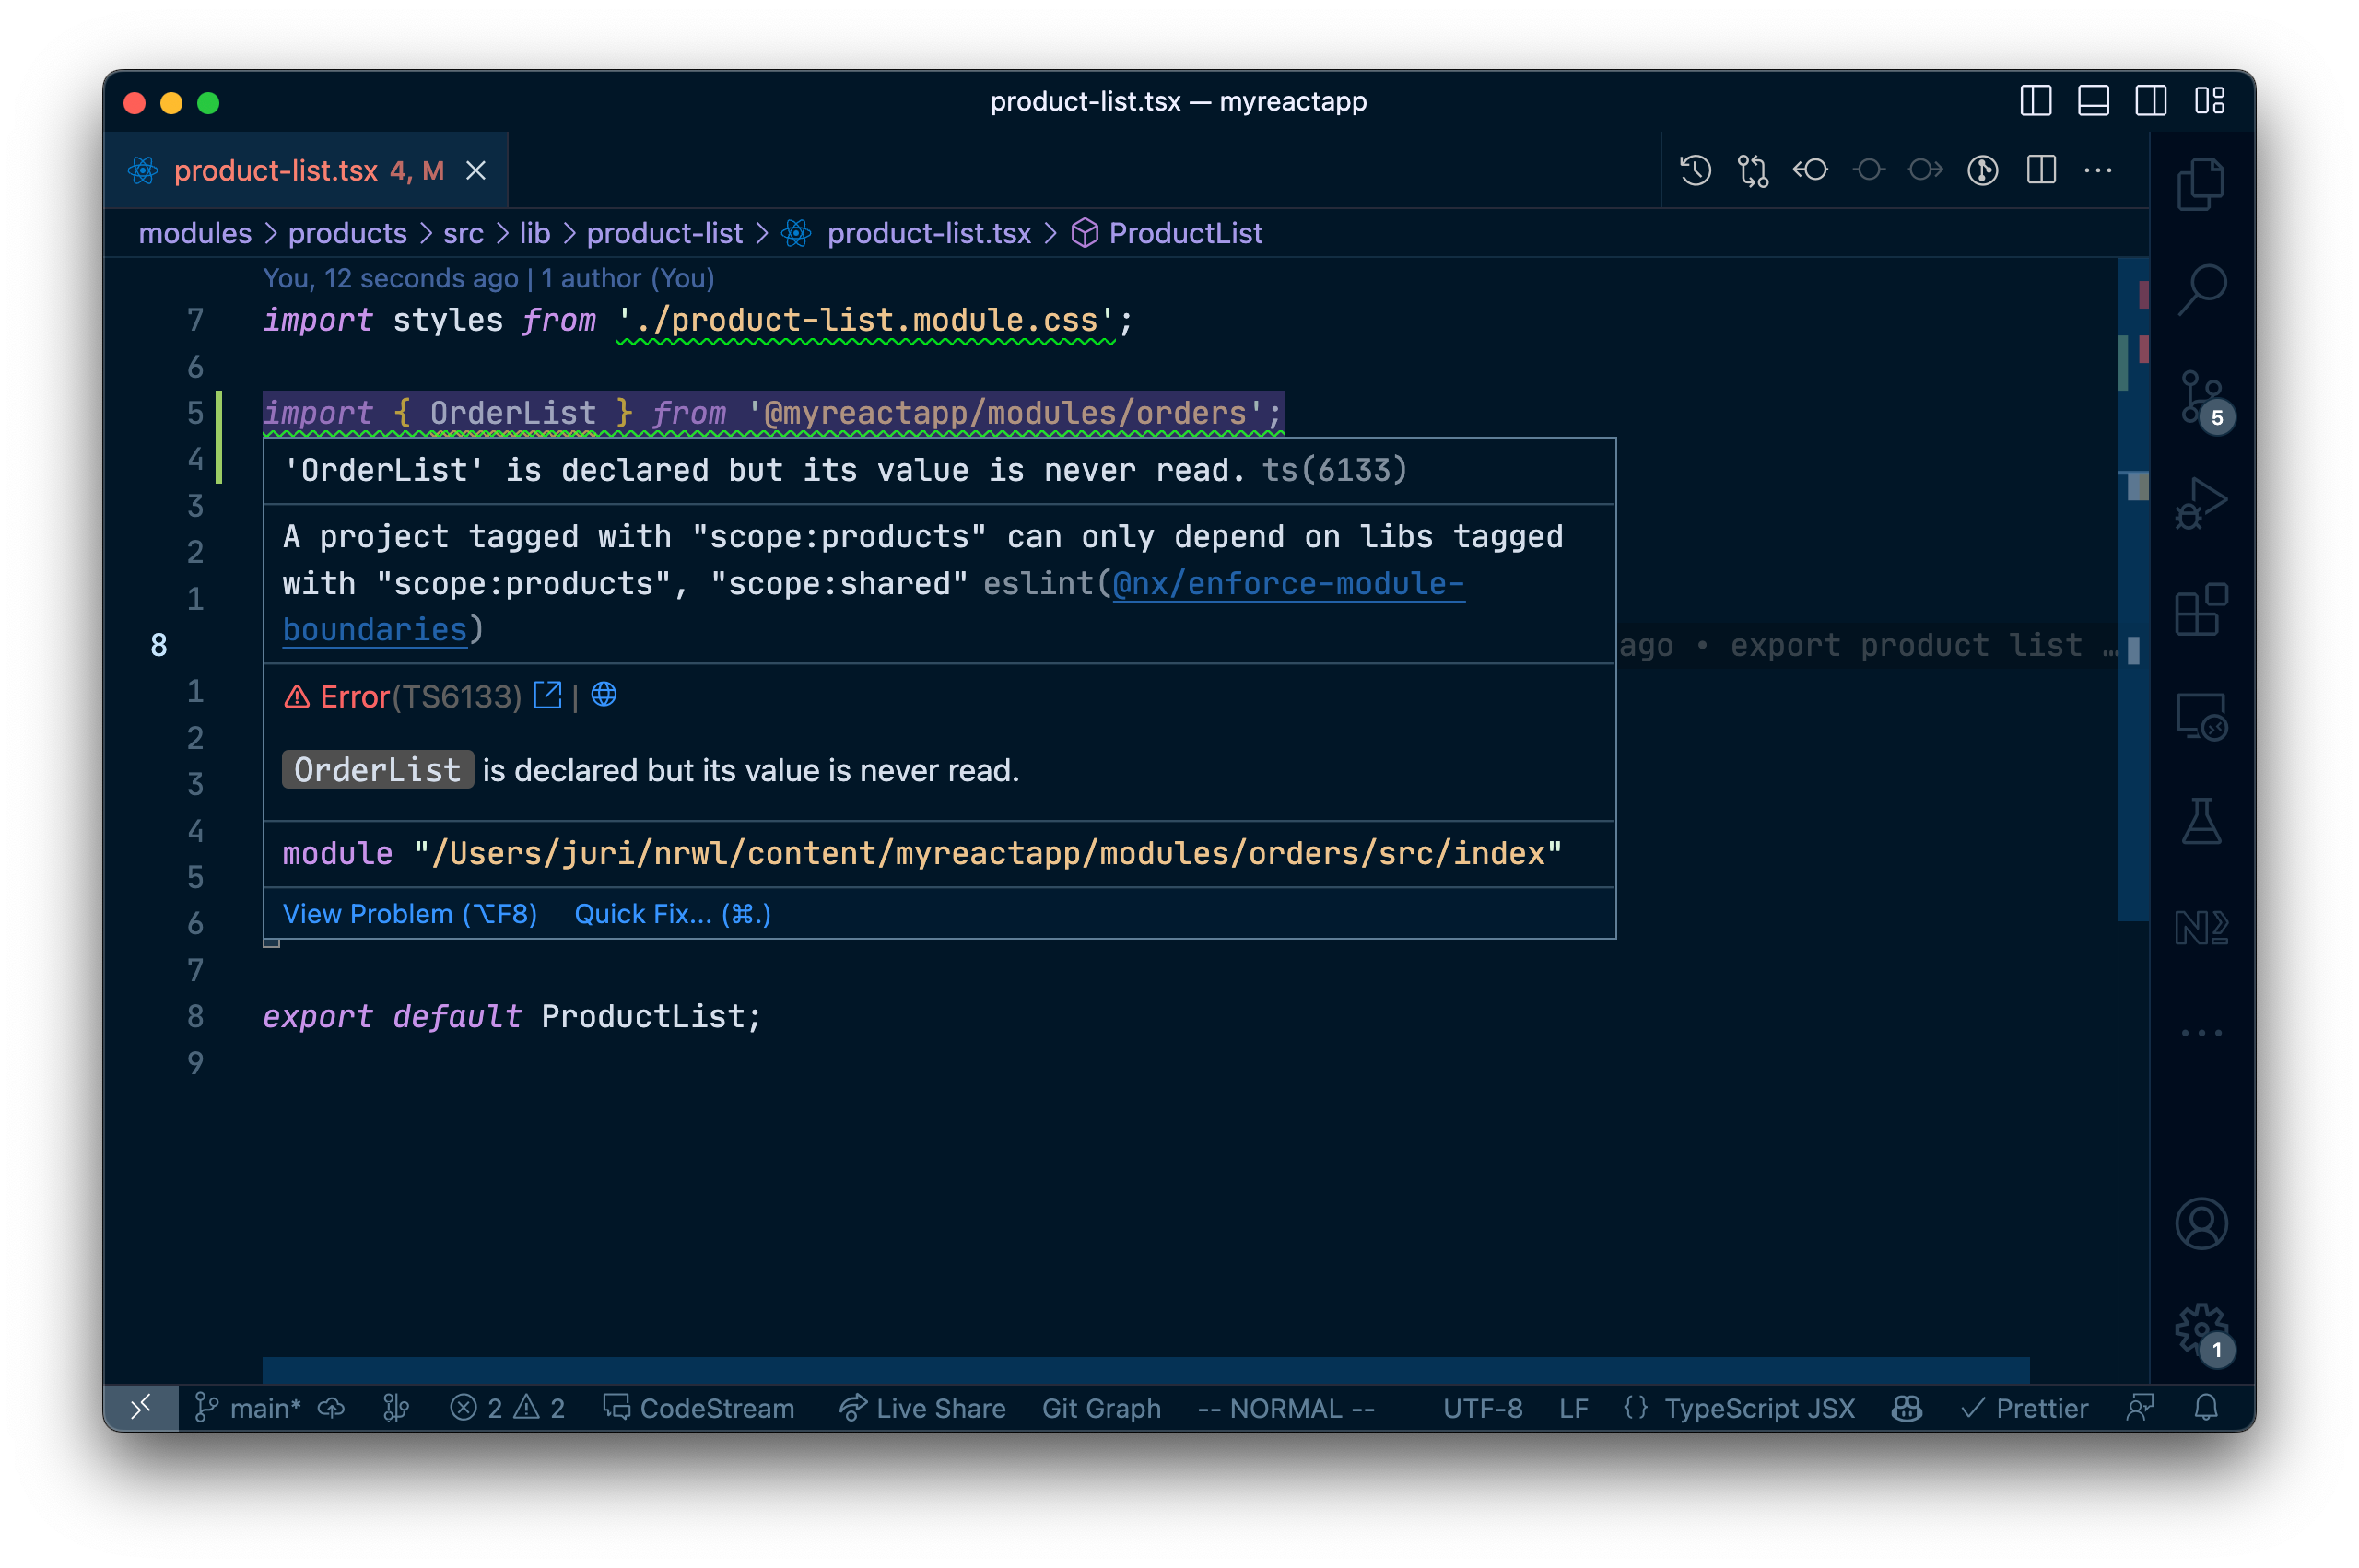
To test it, go to your modules/products/src/lib/product-list/product-list.tsx file and import the OrderList from the modules-orders project:
import styles from './product-list.module.css';

// This import is not allowed 👇
import { OrderList } from '@myreactapp/modules/orders';

/* eslint-disable-next-line */
export interface ProductListProps {}

export function ProductList(props: ProductListProps) {
  return (
    <div className={styles['container']}>
      <h1>Welcome to ProductList!</h1>
      <OrderList />
    </div>
  );
}

export default ProductList;
If you lint your workspace you'll get an error now:
❯
✔ nx run myreactapp:lint [existing outputs match the cache, left as is] ✔ nx run e2e:lint [existing outputs match the cache, left as is] ✔ nx run modules-shared-ui:lint (1s) ✖ nx run modules-products:lint Linting "modules-products"... /Users/.../myreactapp/modules/products/src/lib/product-list/product-list.tsx 3:1 error A project tagged with "scope:products" can only depend on libs tagged with "scope:products", "scope:shared" @nx/enforce-module-boundaries ✖ 1 problem (1 error, 0 warnings) Lint errors found in the listed files. ✔ nx run modules-orders:lint (1s) ———————————————————————————————————————————————————————————————————————————————————————————————————————————————————————————— > NX Ran target lint for 5 projects (1s) ✔ 4/5 succeeded [2 read from cache] ✖ 1/5 targets failed, including the following: - nx run modules-products:lint
If you have the ESLint plugin installed in your IDE you should immediately see an error:
Learn more about how to enforce module boundaries.
Next Steps
Here's some more things you can dive into next:
- Learn more about the underlying mental model of Nx
- Learn how to migrate your CRA app to Nx
- Learn how to setup Tailwind
- Setup Storybook for our shared UI library
- Speed up CI: Run only tasks for project that got changed]
- Speed up CI: Share your cache]
- Speed up CI: Distribute your tasks across machines
Also, make sure you
- Join the Nx community Slack to ask questions and find out the latest news about Nx.
- Follow Nx on Twitter to stay up to date with Nx news
- Read our Nx blog
- Subscribe to our Youtube channel for demos and Nx insights